Objective
In this article, I’ll explain a powerful feature Image Recognition of Automation Anywhere Enterprise tool.
Image Recognition
Image Recognition (IR) is strong command in Automation Anywhere to click (Left, Right, Double) on any object on windows/web based applications. IR command used object as image and recognized the image into application image, in other words its identify an image in other image and if image found then able to click (Left, Right, Double) on image (Object)
How Image Recognition work.
We are providing step by step action to use Image Recognition command in Automation Anywhere, please refer Fig 1.1 and follow the followings steps
- Image1: (This is the image in which you are searching the following image i.e. image2)
- Select window: This dropdown box will populate the “title” of all the open application. If any application title is not shown into dropdown box you can click on to “Refresh” button and select “Title” from dropdown box.
- Click on Capture: After select the title in “Select Window” dropdown box, click on “Capture” button. This will active the same application, title choose in “Select Window”, now you can select the specific area of that application or complete application visible area.
- Check Box Show Coordinates: Tick on this checkbox will give you the opportunity to select image coordinate as (Top, Right, Bottom and Left as rectangle selector) as shows in Fig 1.2, however these fields automatically populate once you use “Capture” button as describe in point no 1.b.
- Waiting before capturing the image: This field contain the waiting time in milliseconds. It will help and wait to load application screen properly before start IR command.
- Image2: (This is the image you are searching in above image i.e. image1)
- From Window: this is the same option as mentioned in 1.a, normally this dropdown value should be same as select window in I.a
- Capture: After select the title in “Select window” click on “Capture” button, this action will again active the same window and now this time you need to capture only Object area
- If Image Found: If image2 found in image1 then you can select the action event as Left Click, Double Click or Right Click
- Match Percentage: Match percentage is 100 by default, it means Image2 should be 100% same in Image1. But sometime due to complexity image quality is not good in that case we can reduce the match percentage which will decrease the possibility of failure. This value should not more 100 ideally.
- Tolerance: Tolerance and match percentage is used with each other, let suppose if you set match percentage as 90 then IR command automatically consider tolerance value as 10. However best practice is to mention tolerance value.
- Comparison mode: There are three type of comparison mode in IR command.
-
- Normal: if comparison mode is normal, it means IR command will find image2 in image2 as it is. For example, if image1 has multiple color and image2 has specific color then in this mode IR command will find exact same image.
- Gray-Scale: if comparison mode is gray scale then IR command will convert image1 and image2 into gray color (single color). This option will decrease the failure percentage.
-
- Monochrome: Monochrome comparison mode is usually used for Main Frame, DOS type of software. In which application window is black and white.
- Quick Test: This quick test button is very use full in IR command. You can test your settings by clicking on quick test button. After click on this button IR command will execute itself instantly and will display a confirmation message whether IR command can recognize the image2 in image1.
- Checkbox Repeat if image not found: This checkbox is very important and relevant here, if IR command not able to find image2 in image1 in first attempt then you can allow IR command for how many times IR command will retry to find image2 and for each try how much time gap should be there. By default, there is value 10 in Times and 300 MS (milliseconds) in Wait between repeats. You can change this value as per complexity.
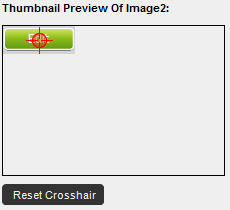
Reset Crosshair: There is red circle pointer, refer to Fig 1.4, in “Thumbnail Preview of Image2” second. This red circle pointer can be move to specific place on image to perform action as mention in point no 3. Sometime you move this red circle pointer and forget its default location then you can click on “Reset Crosshair” button, this button click event will reset the location of red circle point as it was initially set during capture the image2.
Fig 1.1
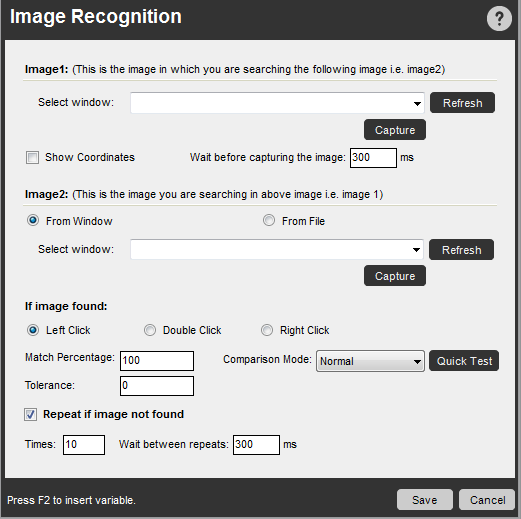
Fig 1.2

Fig 1.3
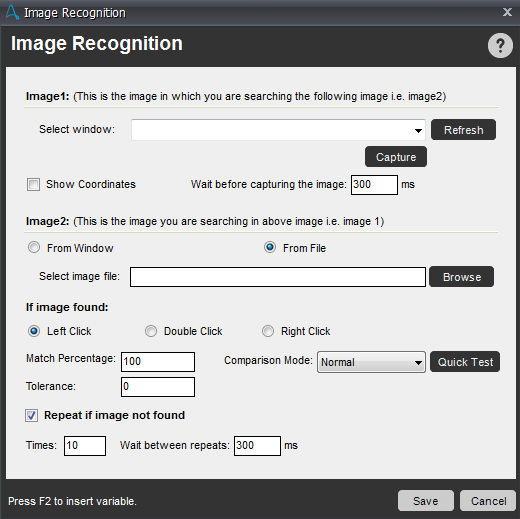
Fig 1.4