Objective:
In this article, we’ll see what is “Insert Keystrokes” and why this command is so important in Automation Anywhere-RPA Tool.
Insert Keystrokes:
Sometime we need to use command using keyboard to act on an application. To perform these types of action we can use “Insert Keystrokes” command in automation anywhere
Keystrokes is pressing any Function Key i.e. (F1, Del, Page Up and Tab etc) or any special command which can be combination of Alphabets or Numeric with control “Ctrl” or “Alt” or “Shift” key for example “Ctrl+s” is used to save the document or “Alt+F4” to close currently active window.
How to use “Insert Keystrokes” command
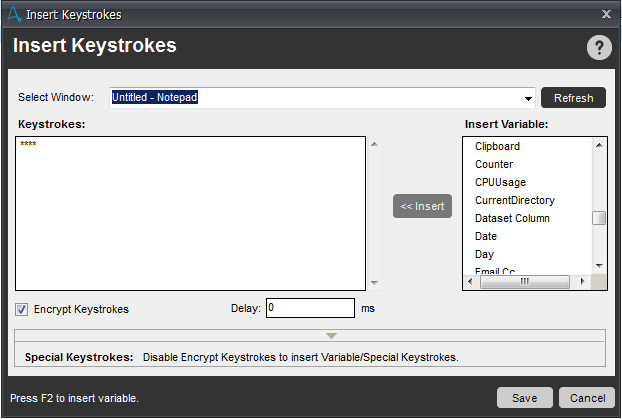
To use “Insert Keystrokes” command in automation anywhere please refer to Fig 1.1 and follow the following steps.
- Select Window: All the opened application’s title will be populated in the dropdown box. You can select any application title where you need to perform a “Keystroke”.
- Refresh: if any title of opened application is not showing in dropdown box then click on “Refresh” button. It will refresh dropdown box and re-populate the “Title” of all the opened applications.
- Keystrokes: We can put our commands/content in this field. Following are the item which can be used in this field.
- Alphanumeric: we can simply type a paragraph as “Keystrokes” but it’s not recommended, but if there are other commands working then we can use this command to insert data into specific field.
- Special Keystrokes: This section of “Insert Keystrokes” command consists all the special key available in standard keyboard refer to Fig 1.1 for example if you need to save a document you can use “Ctrl + s” so keystrokes sequence will be “[Ctrl Down]s[Ctrl Up]”
- Insert Variable: This list box contains the all the custom created variable name, system variable name and Keys created in credential manager in control room. You can use variable value in Keystrokes
- Insert button: you can use variable value into Keystrokes for this you can choose variable from list box on right side refer to Fig 1.1 named “Insert Variable”. Insert button will move variable name into “Keystrokes” field
- Check box Encrypt Keystrokes: This checkbox is used to encrypt the content of “Keystrokes” for security purpose refer Fig 1.2. We can tick this check box to encrypt the value of “Keystrokes” field.
- Delay: Delay is very important factor in this command. This delay value is time in milliseconds, which will allow this command to give a small break for typing the content/perform key strokes on application, for example if we are trying to insert “Robotics” and mention delay as 800 milliseconds, then Keystroke command will consider 100 milliseconds delay to type each character of “Robotics”, this calculation will be work for commands or variable values as well. If we’ll not used delay, there will be chances to skip typing content/key strokes. You can insert a variable as well in this field if you storing time in a variable use F2 to use variable.
Fig 1.1
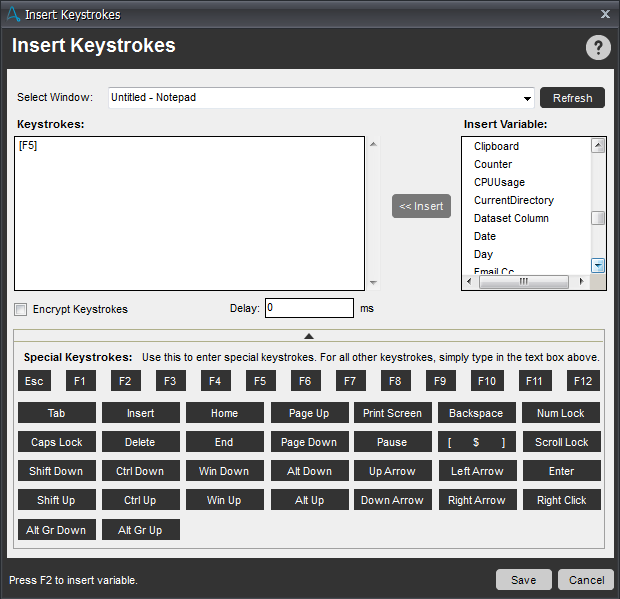
Fig 1.2